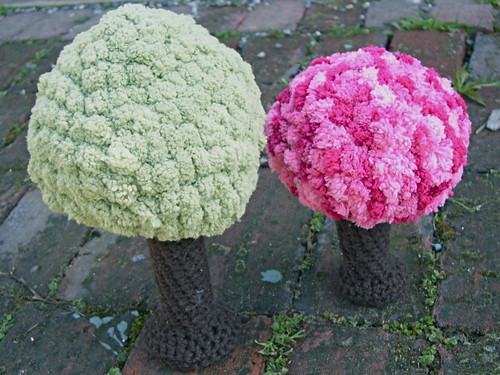
To make a cherry blossom tree, or a fluffy green tree, you will require:
1 skein Pompadoodle - Peaches and Cream for a blossoming cherry tree, or Sage for a leafy tree
Vanna’s Choice - Lime for cherry tree, or Olive for leafy tree. You'll have leftovers. Any worsted weight yarn will do.
Alpaca Love - Espresso Bean - uses a small amount. Any dark brown worsted weight yarn will do.
Size I crochet hook
Short length of dowel or pvc pipe. 5.5” for the pattern as written, longer if you want a taller tree. Measure when you get to round 29, if you've changed the tree height, + half an inch.
Large button, or bottle cap about two inches in diameter.
Holding one strand of Pompadoodle with one strand of Vanna’s choice, make a loop, chain one, and make six single crochets in the loop. Until switching to the brown yarn, always crochet into the back loop of a stitch.
Round 1 - *Crochet two single crochets in the back loop of the first single crochet.* Repeat around. You should have made 12 single crochets this round.
Round 2 - *Crochet two in the first stitch, single crochet in the next stitch* Repeat around - 18 stitches
Round 3 - *Crochet two in the first stitch, single crochet in the next two stitches* Repeat around - 24 stitches
Round 4 - *Crochet two in the first stitch, single crochet in the next three stitches* repeat around - 30 stitches
Round 5 - *Crochet two in the first stitch, single crochet in the next four stitches* repeat around - 36 stitches
Round 6 - 8 - Crochet in every stitch - 36 stitches
Round 9 - *Decrease, then crochet the next three stitches* repeat around - 30 stitches
Round 10 - *Decrease, then crochet the next two stitches* repeat around - 24 stitches - Cut the Pompadoodle and Vanna’s Choice, leaving a short tail of a few inches
Round 11 - Using the dark brown yarn, crochet around - 24 stitches
Round 12 - *Decrease, then crochet the next stitch* repeat around - 18 stitches
Round 13 & 14 - Crochet around - 18 stitches
Stop crocheting and pull the yarn tails to the inside of the tree. Stuff the blossoming part with fiber fill, but not too full.
Round 15 - *Decrease, then crochet the next seven stitches* repeat - 16 stitches
Round 16 & 17 - Crochet around - 16 stitches
Round 18 - *Decrease, then crochet the next six stitches * repeat - 14 stitches
Round 19 & 20 - Crochet around - 14 stitches
Round 21 - *Decrease, then crochet the next five stitches* repeat - 12 stitches
Round 22-25 - Crochet around - 12 stitches (To make a longer trunk, add a few rounds. To make a shorter trunk, subtract a couple)
Round 26 - *Crochet two in the first stitch, single crochet in the next stitch* repeat around - 18 single crochets
Round 27 - *Crochet two in the first stitch, single crochet in the next two stitches* repeat around - 24 stitches
Round 28 - Crochet around - 24 stitches
Round 29 - Working in the front loop only, *decrease, crochet the next two stitches* 18 stitches
Cut the dowel or pipe to 5.5” long, and glue to the center of the bottle cap. When dry, place in the trunk to give the tree stability. Make an indent in the stuffing in the top part of the tree, so the tree will be more stable. Now continue to crochet the trunk closed.
Round 30 - *Decrease, crochet the next stitch* repeat around - 12 stitches
Round 31 - Decrease around - 6 stitches
Fasten off yarn and leave a tail long enough to gather up the remaining stitches tightly. Tie off and weave in the end.
Have fun with your tree. Make an orchard or a forest, or maybe some animals to play among the trees.

Fluff Trees Pattern by Anike Maj is licensed under a Creative Commons Attribution-NonCommercial-ShareAlike 3.0 Unported License.
No comments:
Post a Comment